


📑 Table of Contents
In this ultimate guide, you’ll learn how to leverage camera tracking in Blender so you can seamlessly integrate 3D elements into your live-action shots. By effectively matching virtual cameras to real-world footage, you create an illusion that 3D objects naturally belong in the scene, no matter the perspective changes. Yeah, I’ve been there too, wondering why my 3D elements didn’t blend properly. Let’s fix that together.
Before diving in, remember that camera tracking (also called match moving) is an essential skill for 3D compositors, VFX artists, and indie filmmakers alike. You’ll map the motion and lens characteristics of real-world footage, then use that data to anchor digital objects in a way that makes everything look realistic. Ready? Let’s break it down step by step.
Review camera tracking fundamentals.
Camera tracking is the process of analyzing live-action footage to derive camera movement and lens details, then syncing those with a virtual camera. Here’s what that typically involves:
- Identifying Track Points: Special spots in your footage that software can follow from frame to frame.
- Calculating a Solution: Software uses these tracked points to figure out the camera’s position, rotation, and sometimes lens distortion.
- Building a 3D Scene: Once the motion is solved, you can introduce 3D models, particle effects, or animations that move as if they’re part of the real environment.
If you want a deeper dive into the fundamentals, consider checking out the 3d camera tracking tutorial. It covers the key steps you’ll face regardless of your chosen software.
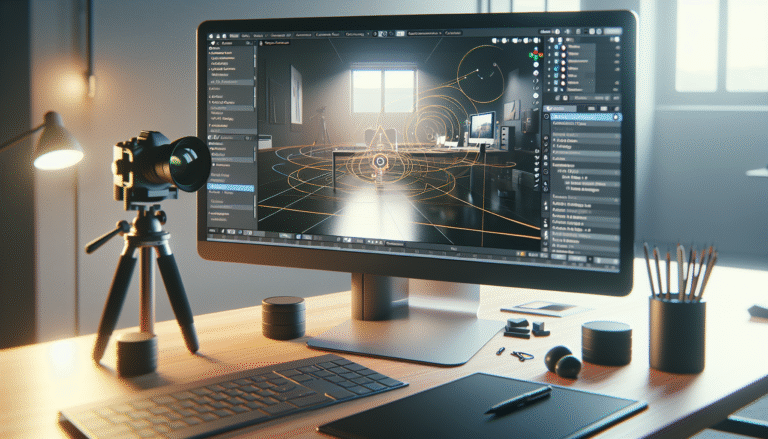
Set up Blender for tracking.
You’ll spend most of your time in Blender’s Movie Clip Editor when tracking. Before loading footage, make sure your scene is at the same frame rate as your video. This preemptive step ensures your track lines up correctly and frames don’t slip.
- Create a New Project: Go to File > New and select your general settings.
- Open the Movie Clip Editor: From the top menu, switch to the “VFX” workspace or add a new editor window for tracking.
- Import Footage: Click “Open” and select your video clip. Keep track of your clip’s frame rate, resolution, and metadata.
By configuring these details from the get-go, you’ll make your workflow smoother. If you prefer to see how other software approaches match moves, you can also explore camera tracking in Nuke or After Effects for comparison.
Add and refine tracking markers.
You’re bound to place multiple tracking markers, and each one is crucial. Here’s the process to keep them accurate:
- Pick Distinct Features: In your footage, look for points with contrasting edges, such as a high-contrast spot on a wall or a piece of distinct texture.
- Add a Marker: Ctrl + LMB (or use the “Add Marker” button). You’ll see a small box that defines your search area.
- Track Forward or Backward: Blender will move the marker through the footage frame by frame. Watch for drift, then adjust if you see errors.
Whenever you notice your track drifting, correct it immediately to avoid compounding errors. You might also label or color-code tricky markers (for example, those near fast-moving objects) to keep track of potential trouble spots.
Solve the camera motion.
With stable markers in place, your next step is to solve for the camera’s movement. Think of it as letting Blender do the math to figure out exactly how the camera was moving in real life.
- Set Up Key Frames: In the Solve panel, define which frames contain your best tracks. Usually, choose a frame at the start and another at the end of the shot.
- Enable Refinements: You may want to refine the focal length and principal point if actual lens data is unknown.
- Solve: Click “Solve Camera Motion.” Blender calculates the camera path and outputs a “Solve Error.” Aim to keep that error as low as possible (below 1.0 is generally good).
If your error is high, Blender is telling you to double-check your track markers or lens settings. Don’t worry, we’ve all been there. You can usually fix it by removing any bad tracks or refining your lens data.
Adjust scene orientation and scale.
Once Blender has solved your camera, you’ll see a cloud of tracking points that represent the 3D space of your scene. Now, it’s time to orient that point cloud properly so your 3D elements sit in the right place.
- Origin: Select a track that you want to be your “center” point and set it as the origin.
- Floor Alignment: Select three points on the ground plane to define the location of your 3D floor. This helps Blender determine which direction is considered “up.”
- Scale: If you know real-world distances, you can input those here so your 3D objects have realistic measurements.
This may seem tedious, but it’s worth it. Getting orientation right ensures your 3D objects don’t look oddly tilted or out of proportion when composited.
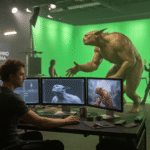
Integrate 3D elements
With the camera solved, you’re free to add your 3D elements in Blender as if they were part of the real scene. Go to your layout workspace and:
- Import or Create Your 3D Models: Buildings, spaceships, product prototypes, you name it.
- Position Them in the Scene: Align them with the point cloud or reference geometry you’ve set up.
- Light and Texture: Match the lighting conditions and textures from your real footage. Even a perfectly composed camera track won’t help if your 3D lighting is misplaced.
At this stage, you’re effectively placing all your digital assets exactly where the real camera would see them. Embrace your creativity, but maintain realism when the job requires it.
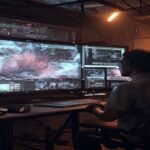
Enhance your final composite.
After the core track is done and 3D objects are placed, you want a final composite that sells the illusion. That includes color correction, roto work, or even reflection passes if your objects interact with surfaces.
1Troubleshoot common pitfalls
- Flickering or Jitter: Usually caused by inaccurate track markers. Go back and refine them.
- Scale Issues: If an object seems bigger or smaller than it should, re-check your orientation and scale points.
- Sliding Objects: If the 3D element appears to move independently of the scene, it probably means your track data is inconsistent or your solve error is high.
By refining each of these issues, you inch closer to a shot that nobody can detect is composited. It’s a friendly neighborhood reminder that a big shout-out goes to your keen eye for detail here.
Wrap up with best practices.
You now have a clear understanding of how to implement camera tracking in Blender, and I assure you that it will become more intuitive with practice. Make sure you:
- Use high-quality footage with minimal compression.
- Keep your real-world camera specs handy, if possible.
- Gather multiple track points with good coverage across the frame.
- Explore advanced match-moving concepts in VFX for a deeper understanding.
Mastering this skill can truly transform how you combine live-action shots and digital elements. Think of it as unlocking a door to new creative possibilities. So, fire up Blender, pinpoint those track points with precision, and make sure to give yourself a big “THANK YOU” for learning this essential skill. You’ll be well on your way to incredible composites that look utterly seamless. Good luck out there!
FAQS – Frequently Asked Questions
1. What Is Camera Tracking In Blender?
Camera tracking in Blender is a visual effects technique that matches the movement of a virtual camera to a real-world camera, enabling seamless integration of 3D elements into live-action footage.
2. Why Is Camera Tracking In Blender Important For VFX?
Camera tracking in Blender is crucial for VFX because it helps accurately place CGI elements into real-world footage, maintaining perspective, motion, and realism.
3. Can Beginners Learn Camera Tracking In Blender Easily?
Yes, Blender provides intuitive tools and tutorials that make camera tracking in Blender accessible for beginners who want to enter the VFX field.
4. How Accurate Is Camera Tracking In Blender Compared To Paid Software?
Camera tracking in Blender is highly accurate and often comparable to premium tools like PFTrack or Boujou when used correctly.
5. What Are Key Features Of Camera Tracking In Blender?
Key features of camera tracking in Blender include motion tracking, lens distortion calibration, and 3D scene reconstruction.
6. Is Camera Tracking In Blender Suitable For Professional Projects?
Absolutely. Many indie filmmakers and studios use camera tracking in Blender for professional-grade visual effects work.
7. What Footage Works Best With Camera Tracking In Blender?
Footage with clear tracking points, consistent lighting, and minimal motion blur works best for camera tracking in Blender.
8. Can I Use Camera Tracking In Blender With Green Screen?
Yes, camera tracking in Blender can be used in combination with green screen compositing to add 3D elements into keyed footage.
9. What Are Tracking Markers In Camera Tracking In Blender?
Tracking markers are visual reference points that Blender uses to calculate camera movement during the camera tracking process.
10. Does Camera Tracking In Blender Support Lens Distortion Correction?
Yes, Blender has built-in tools for correcting lens distortion, which is vital for accurate camera tracking in Blender.
11. How Long Does Camera Tracking In Blender Take?
The time varies based on footage complexity, but camera tracking in Blender generally takes 10–30 minutes for standard clips.
12. Can I Export Camera Tracking Data From Blender?
Yes, you can export camera tracking in Blender data to other 3D software using formats like FBX and Alembic.
13. What Is The Difference Between Manual And Automatic Camera Tracking In Blender?
Manual tracking offers more control over each point, while automatic tracking in Blender speeds up the process by auto-detecting features.
14. Is Camera Tracking In Blender GPU Accelerated?
Camera tracking in Blender primarily uses the CPU, though some visualization and rendering tasks are GPU-accelerated.
15. Can I Track Handheld Footage Using Camera Tracking In Blender?
Yes, Blender’s robust motion tracking tools make it ideal for stabilizing and tracking handheld footage with dynamic motion.
16. What Version Of Blender Supports Camera Tracking?
Camera tracking in Blender has been supported since version 2.61, with continuous improvements in recent releases.
17. How Do I Add 3D Objects After Camera Tracking In Blender?
After performing camera tracking in Blender, you can add and align 3D models to match the scene using the tracked camera data.
18. Are There Any Add-Ons For Enhancing Camera Tracking In Blender?
Yes, several add-ons like "Blam" and "TrackMatchBlend" can enhance your camera tracking in Blender experience.
19. Can Blender Handle High-Resolution Footage For Camera Tracking?
Yes, camera tracking in Blender handles high-resolution footage, though system performance may vary depending on hardware.
20. What Are Common Mistakes To Avoid In Camera Tracking In Blender?
Avoid low-contrast footage, excessive motion blur, and skipping lens calibration when working with camera tracking in Blender.
21. How Can I Learn Camera Tracking In Blender Effectively?
You can learn camera tracking in Blender through online tutorials, Blender’s official documentation, and hands-on VFX projects.
📑 Table of Contents
Master VFX, Design & AI in Chennai
Industry-standard training with 100% job placement. Start your creative career today!
🚀 Enroll Now💬 WhatsApp Us📂 Categories
Graphic Design (49)VFX (21)Action CGI (11)Visual Effects (10)Live Action (9)Typography (9)chroma key (6)Green Screen Keying (6)Stereoscopic 3D (5)Digital Marketing (5)Visual Effects (5)SEO (5)Camera Tracking (4)3D Movie (3)AI Graphic Design (2)app Development (2)UI UX (2)Match moving (1)Web Development (1)Film Editing (1)🎯 Related Courses
📚Blender Course in Chennai📰 Recent Posts